Handmade Xmas Cards and Tags
I love making Xmas cards and sending them to people I know will not only enjoy but also appreciate the effort that goes into making them. It can be a pretty time consuming job and even with all the best intentions in the world I always seem to leave it to the last minute..............but NOT this year. With all my xmas stuff still out I put it to Mary and Kim that instead of doing our normal scrapping every second weekend perhaps we could make a start on our cards for this year, of course they saw the amazing logic behind it soooo we had a few saturdays of making cards and tags. I would like to share with you some that I made and let you know some techniques that I used.
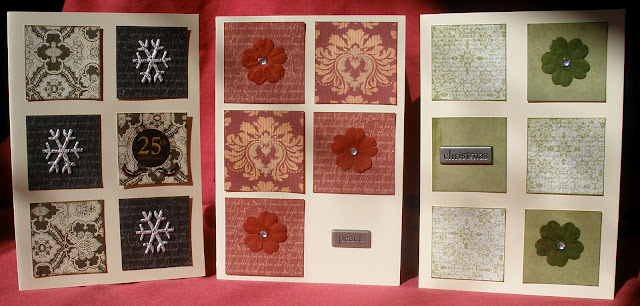
This couldn't be more simple (pinched the idea from the gorgeous Miss Kim) just small squares of pp, inked and placed on the card, I kept the embellies pretty simple, metal tags I have had forever, pieces of snowflake ribbon from http://www.craftqueen.com.au/index.php and small white Kaiser flowers that I spent an insane amout of time inking, totally forgetting that I already had some in the right colour d'oh!.

Next up I used my cuttlebug (used it quite a few times), got the idea for this off the net, for the life of me can't remember where, but thanks. Ribbon again from Craft Queen and Santa image from the Graphics Fairy http://graphicsfairy.blogspot.com.au/ she has some amazing Xmas images there.
 Again with the cuttlebug, folders are Tuscan Tiles (Craft Concepts Universal Folder) and Polka Dots (Cuttlebug), used a gorgeous stamp on the card first and then stamped the greeting, with a red pen coloured in some of the little holly berries, you could also use Kiddy Glitz.
 Using the same Tuscan Tiles folder and a tri fold card with rectangle window, lightly rubbed silver ink over the embossed section (again pinched this idea from Kim, very talented lady) then just added some rhinestones and couple of other embellies.
 Again pretty simple all ribbons from Craft Queen, bits of Kaiser embellies, hand made tulle flower and gorgeous poinsettia flower from http://www.my2angels.net/p/5023/Poinsettia-Mulberry-Paper-Flowers-in-Organza-Christmas-Bag.html
 Again saw this on the net and downloaded the tutorial for it from my2angels http://www.my2angels.net/s/71/Christmas-Cards.html a bit fidly cutting out the little presents from the pp, but the end effect was worth it.
 This started out as a small tag, but when I put it on the big tag and then on the brown cs card I thought, well don't mind how that looks.
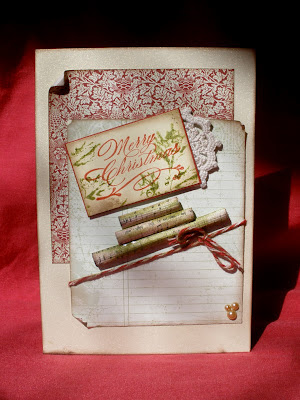 Another idea from the net, totally loved it so put my spin on it, printed out some xmas music onto plain paper and then because the white was way too stark, sprayed with Creme de Chocolate Glimmer Mist (yummy) inked over it in places with Tim Holtz Distress Ink - Peeled paint, added some cream Kaiser pearls, bakers twine.


Made some lovely (well I think they are) tags, using lots of technique, first up a really gorgeous Darkroom Door Stamp over Tim Holtz Distress Inks - Peeled Painted and Fired Brick, added Holly Leaf Ribbon from Craft Queen and some lace as well as a Bo Bunny Brad.

 Once it's dry spray with a bit more glimer, stamp, run through the cuttlebug and add some embellies and voila, a very unique Xmas tag.

This couldn't be more simple (pinched the idea from the gorgeous Miss Kim) just small squares of pp, inked and placed on the card, I kept the embellies pretty simple, metal tags I have had forever, pieces of snowflake ribbon from http://www.craftqueen.com.au/index.php and small white Kaiser flowers that I spent an insane amout of time inking, totally forgetting that I already had some in the right colour d'oh!.

Next up I used my cuttlebug (used it quite a few times), got the idea for this off the net, for the life of me can't remember where, but thanks. Ribbon again from Craft Queen and Santa image from the Graphics Fairy http://graphicsfairy.blogspot.com.au/ she has some amazing Xmas images there.


Made some lovely (well I think they are) tags, using lots of technique, first up a really gorgeous Darkroom Door Stamp over Tim Holtz Distress Inks - Peeled Painted and Fired Brick, added Holly Leaf Ribbon from Craft Queen and some lace as well as a Bo Bunny Brad.
After Miss Mary told me about this technique she saw, doing the Creative Jump Start Summit at Nathalie Kalbachs' blog http://nathaliesstudio.com/tutorials/creative-jump-start-summit-2012/ I had to enrol (free) and see, now I can't remember which talented lady it was that did this but the idea wasn't really for making tags as such, it was a warm up exercise to help kick start the creative process, but I soooo loved it that I knew I wanted to use it as a technique.
So what do you do, easy peasy, get a sheet of plastic, acrylic, nothing absorbent, spray onto it glimmer mist in whatever colours you like at the time, here I used Santa Baby and Key Lime Green, spritz with a bit of water and then just slap your tag across the puddles of colour, and you end up with something a bit like this.

 Once it's dry spray with a bit more glimer, stamp, run through the cuttlebug and add some embellies and voila, a very unique Xmas tag.
Well that's it for now, if you still have some of your Chrissy stuff out why not think about giving yourself a really good head start to your Xmas Cards, it is so much more fun if you aren't pushing a deadline plus there is the knowledge that you have one xmas thing ticked off the list.
Hugs and love Annette xo


Comments
Hugs
Mary x
These all look totally amazing and who's the talented lady!
You inspire ME!
In the words of Bruno
Because? Your amazing....just the way you are